Neutral Tile Cleaner

Victorian Tiled Hallway Floor Restoration Mablethorpe

Neglected Victorian Tiled Hallway Rebuilt at Mablethorpe Air B&B

Last year I was asked to restore a Victorian tiled floor in the hallway of a property in Mablethorpe which was let out to Holidaymakers. Mablethorpe has a beautiful long sandy beach and is very popular seaside resort, however being so close to the coast does leave it exposed.

Victorian Tiled Hallway Floor Before Restoration Mablethorpe

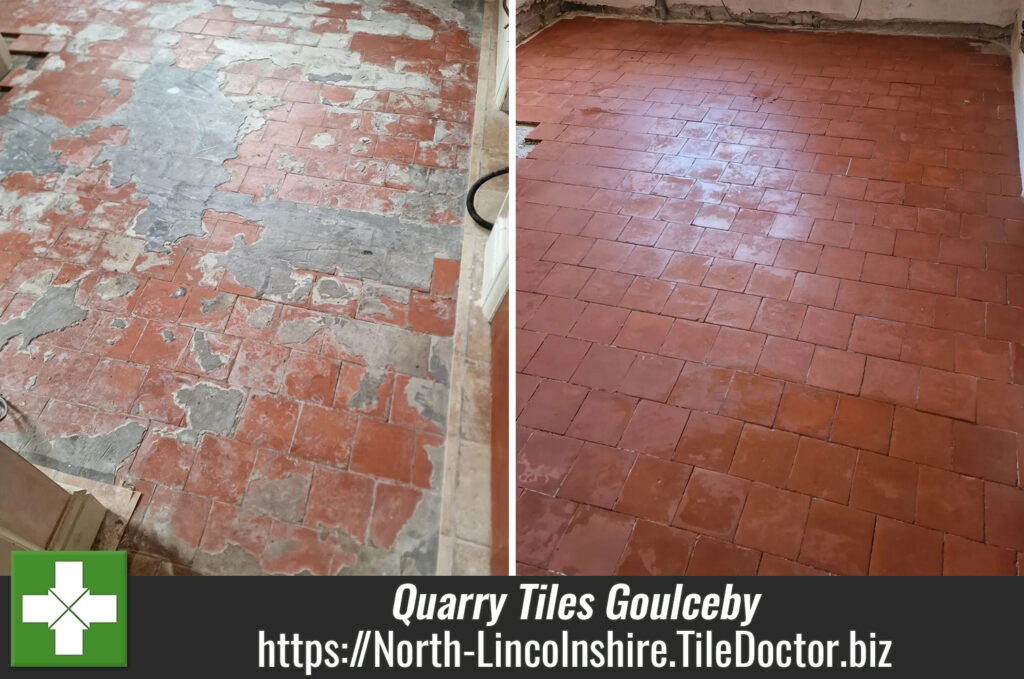
Like many old floors it had certainly seen a lot of wear and as well as a deep clean and seal I identified numerous tiles that would need replacing. None of this was an issue and as part of my quote for restoring the floor I agreed to source the tiles from a specialist supplier.

Victorian Tiled Hallway Floor Before Restoration Mablethorpe

Happy with my quote a date was set for the end of the main season for my return to do the work.

Repairing a Damaged Victorian Tiled Hallway in Mablethorpe

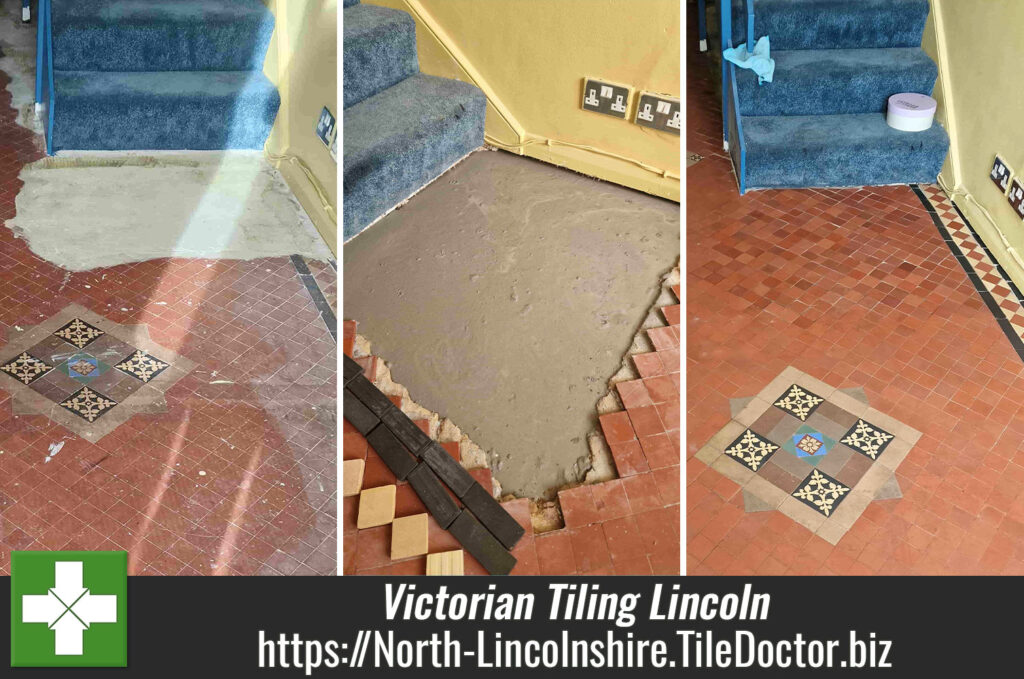
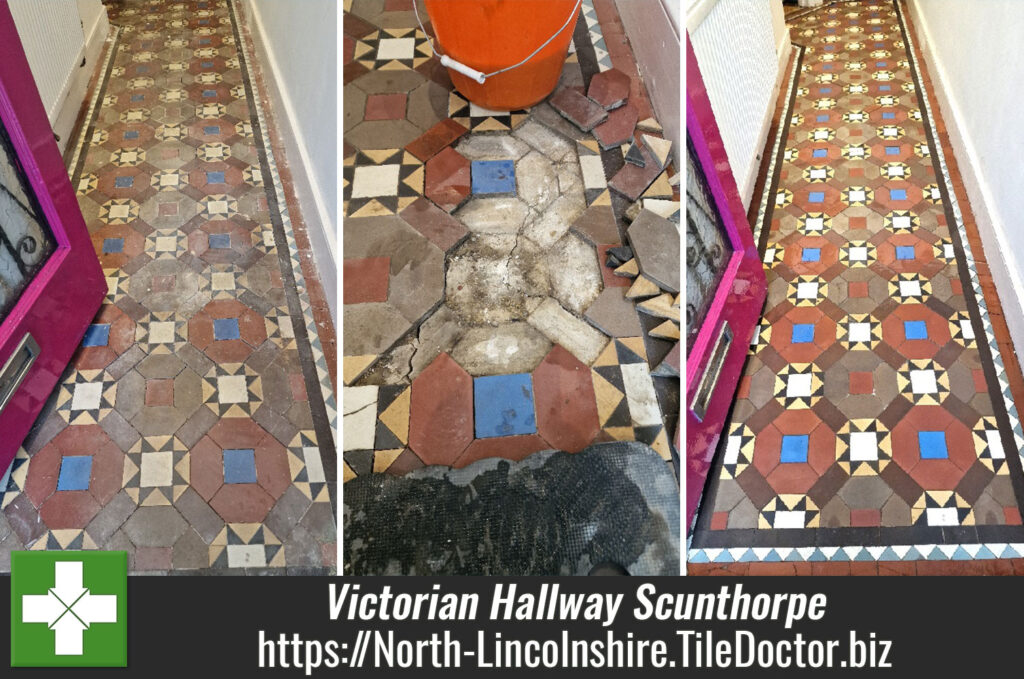
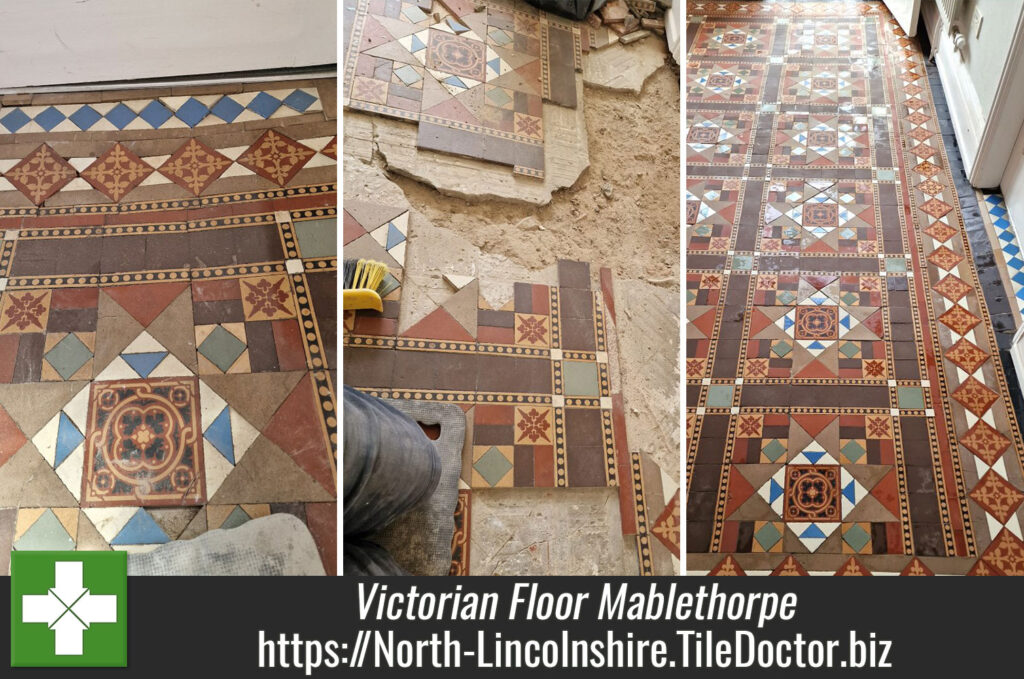
Work started with the repair work and I set about carefully removing the broken and loose tiles, I say carefully as its quite easy to disturb adjacent tiles when doing this and I didn’t want to make the job any bigger. Unfortunately, I discovered that the base beneath the tiles had crumbled in several areas so there was nothing for it but to remove large sections of tiling so it could be rebuilt.

Victorian Tiled Hallway Floor During Restoration Mablethorpe Victorian Tiled Hallway Floor During Restoration Mablethorpe

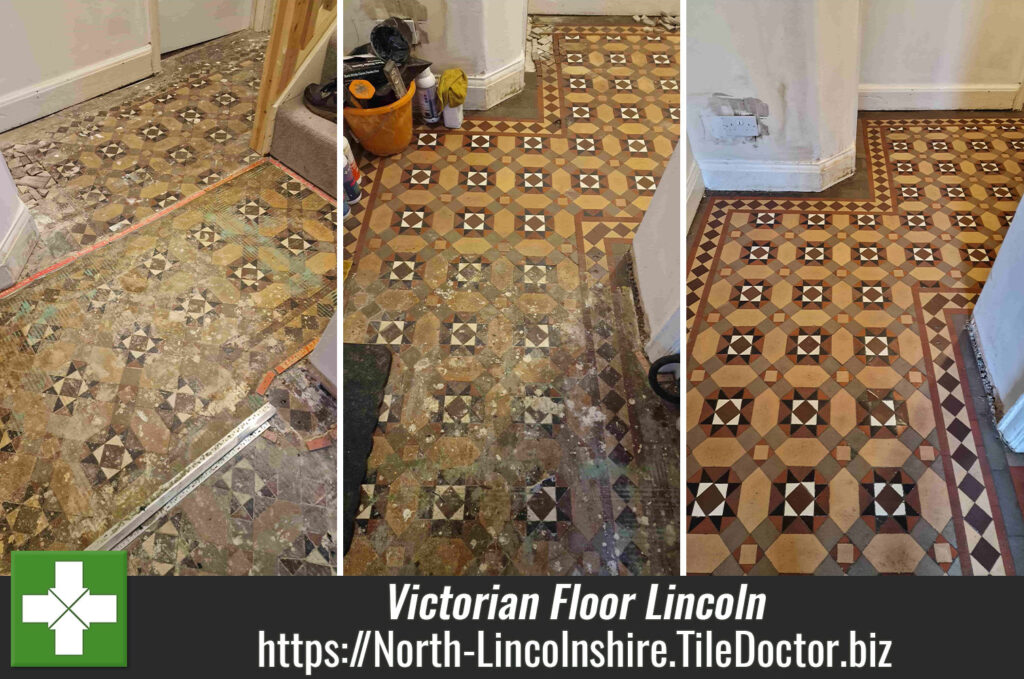
As many of the original tiles were cleaned up for re-use as possible and once the base had been repaired, I was able to start reconstructing the tile floor to march the original pattern. This is careful work and involves cutting and shaping a lot of replacement tiles to match the original pattern and dry fitting them until I the design had been reproduced.

Once I was happy with the pattern the tiles were stuck into place and grouted. It was meticulous work and took several days to complete.

Victorian Tiled Hallway Floor During Restoration Mablethorpe Victorian Tiled Hallway Floor During Restoration Mablethorpe

Deep Cleaning a Victorian Tiled Hallway in Mablethorpe

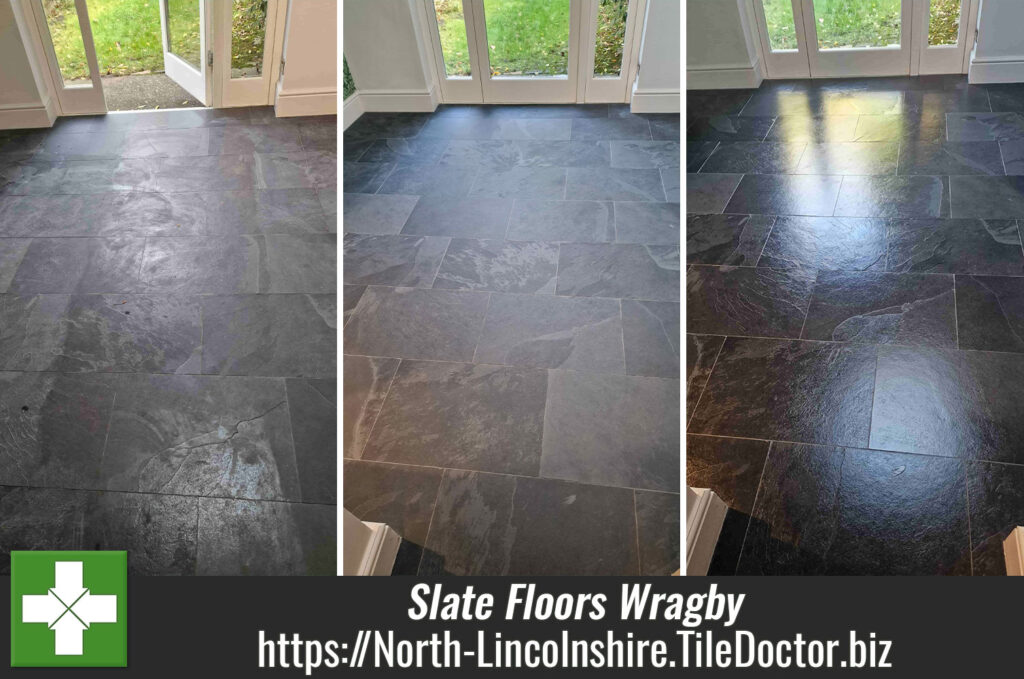
The floor was left to set before returning to do a deep clean with Tile Doctor Remove and Go scrubbed into the tiles with a black pad fitted to a rotary machine. The floor was then rinsed with water and the slurry extracted with a wet vacuum. This product as its name suggests is a coatings remover and tile cleaner that does a good job of removing old sealers and dirt.

Next the floor was given an acid wash using Tile Doctor Acid Gel which was pasted onto the tiles and then brushed in. This product also cleans the floor and being acidic this product neutralises the floor following the use of Remove and Go which is a strong alkaline. It also dissolves any salts that may be lying dormant in the floor which is a common problem with floors of this age that don’t have a damp-proof membrane.

Victorian Tiled Hallway Floor During Restoration Mablethorpe

After this the floor was rinsed and wet vacuumed to remove as much moisture as possible. Once done the floor was left to dry out for a couple of days.

Sealing a Victorian Tiled Hallway

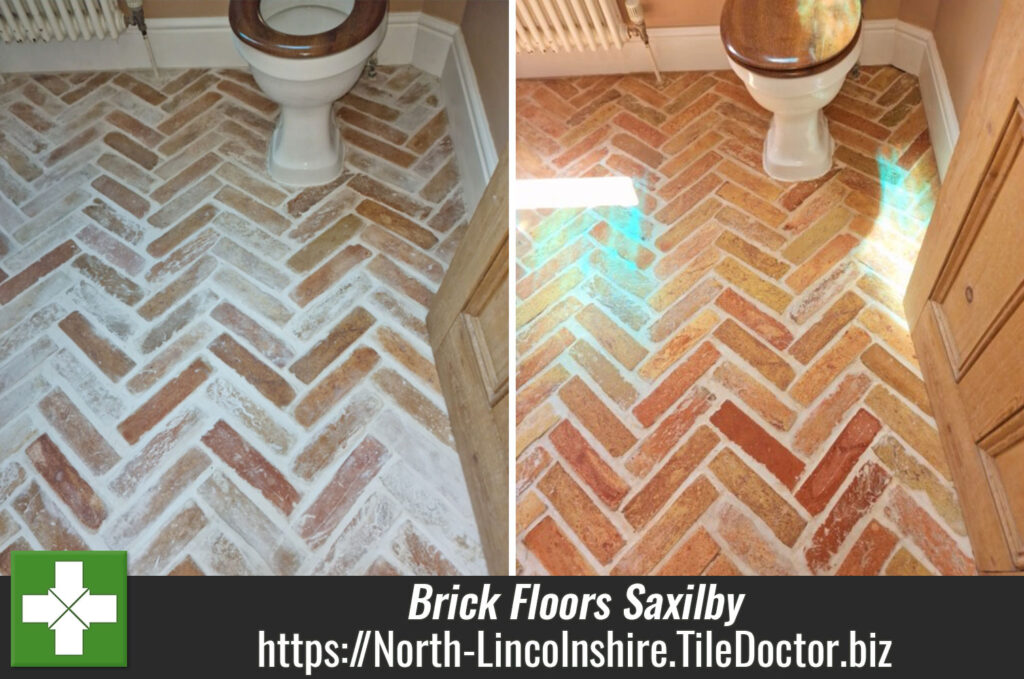
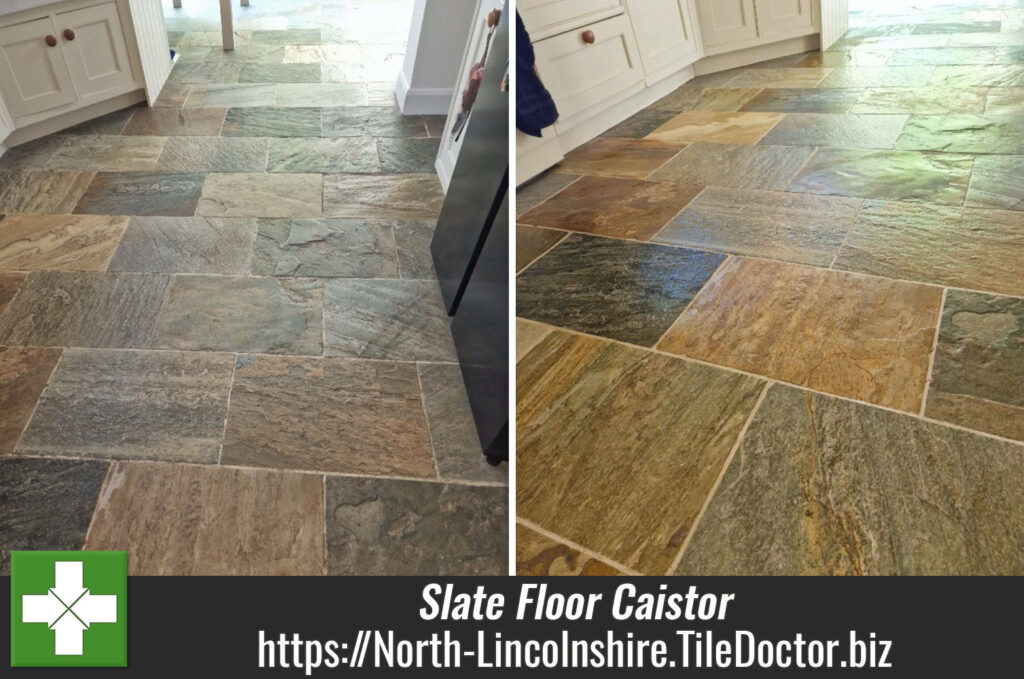
The last step in the restoration was to apply a protective sealer to the tiles which would improve the finish and add protection. Sealers work by keeping dirt on the surface where they can easily be cleaned away and for this floor, we had chosen Tile Doctor Colour Grow.

Colour Grow is a hard-wearing impregnator that soaks into the pores of the tile protecting it from within and as its name suggests improves the colours in the tiles in the process. This product is also fully breathable which is an ideal feature when choosing a sealer for old floors like this one.

Victorian Tiled Hallway Floor After Restoration Mablethorpe Victorian Tiled Hallway Floor After Restoration Mablethorpe

Once complete the floor was structurally sound and should last another 100 years. It also looked much cleaner and brighter and most importantly my client was very happy with the result.

Victorian Tiled Hallway Floor After Restoration Mablethorpe

For aftercare I recommended Tile Doctor Neutral Tile Cleaner which un-like many of the stronger products you find in supermarkets won’t impact the sealer and reduce its life.


Professional Restoration of a Victorian Tiled Hallway in Lincolnshire

Neglected Victorian Tiled Hallway Rebuilt at Mablethorpe Air B&B Read More »

Quarry Tiled Kitchen Floor Restoration Goulceby Louth

Lino Covered Quarry Tiled Kitchen Floor Restoration in Goulceby near Louth

I was asked to look at this Quarry tiled floor at a property in the village of Goulceby near Louth for a client who was renovating their kitchen. Previously it had been covered with lino and they lifted that to reveal the tiles underneath. Realising this floor was original to the property they decided to see if it could be restored and hence contacted Tile Doctor.

Quarry Tiled Kitchen Floor Before Cleaning Goulceby Louth

I went over to survey the Quarry tiles and could see there was quite a lot of cement screed staining on the tiles, a lot of which was quite thick. The installers of the linoleum will have done this to provide a completely level base. Although difficult I knew it could be removed and provided the client with a quote for restoring the floor. This was accepted, and a date scheduled for the work to commence.

Quarry Tiled Kitchen Floor Before Cleaning Goulceby Louth

Cleaning a Quarry Tiled Kitchen Floor

From experience I know the quickest way to remove old screed is to soften it with a steamer and then scrape it off carefully with a large scraper. It is not quick, and the work is quite laborious, but it is effective, in fact removing the screed took the best part of two days.

With the bulk of the screed removed I gave the floor an acid wash using Tile Doctor Grout Clean-up, this product breaks down mineral based contaminates such as the remnants of the cement screed and old grout smears. Being acidic it will also neutralise alkaline salts that may have built up in the tiles. Old floors like this are designed to breathe and the previous coverings would have prevented that. This can lead to moisture being trapped under the floor where it can potentially reach out to the walls and cause rising damp. The Tile Doctor Grout Clean-up was scrubbed in with a mechanical buffer and then the soiling was rinsed off and extracted with a wet vacuum.

I then gave the floor a deep clean using Tile Doctor Remove and Go to get rid of any old sealants and dirt trapped in the tiles itself. I used the previous method of scrubbing with the buffer followed by rinsing and extracting. Last step on day two was to spot treat any remaining problem areas by hand until I was satisfied the floor was as clean as it possible.

I used a lot of water during those two days so despite removing as much of it as possible with the wet vacuum I was concerned it may take a long time to dry out completely, so I left a couple of dehumidifiers in place for a further two days before I returned to apply the sealer.

Sealing a Quarry Tiled Kitchen Floor

On my return I checked the moisture levels of the tiles with a damp meter, taking readings from different parts of the floor to confirm it was dry. All was well so I set about applying the first of two coats of Tile Doctor Colour Grow. This is a breathable colour enhancing impregnating sealer that works by soaking into clay tiles, occupying the pores and ensuring dirt remains on the surface where it is easily cleaned away.

Quarry Tiled Kitchen Floor After Restoration Goulceby Louth

Once complete the Quarry tiled floor was transformed and as you can imagine my client was very happy with the result. They commented that they really didn’t think a tiled floor in this condition could be restored but figured it would be worth giving it a go.

Quarry Tiled Kitchen Floor After Restoration Goulceby Louth

Before leaving I took time to discuss aftercare, and recommended they use a sealer safe Tile Cleaning product such as Tile Doctor Neutral Tile Cleaner.


Professional Restoration of a Quarry Tiled Kitchen Floor Lincolnshire

Lino Covered Quarry Tiled Kitchen Floor Restoration in Goulceby near Louth Read More »

Victorian Tiled Hallway Floor Restoration Lincoln

Restoration of a Carpet Covered Victorian Tiled Hallway Floor in Lincoln

This client contacted me because they were renovating their house in Lincoln and wanted to know it was possible to restore the Victorian tiled floor they found underneath the carpet. They had seen previous work of mine on-line and so confident I could help they decided to get in touch to see what could be done.

Victorian Tiled Hallway Floor Before Renovation Lincoln Victorian Tiled Hallway Floor Before Renovation Lincoln

I went over to survey the floor and could immediately see it needed a lot of work. The floor was covered in all sorts of contamination, carpet adhesive, paint, plaster, cement, years of dirt and there were several areas of crumbled tiles that would need replacing.

Victorian Tiled Hallway Floor Before Renovation Lincoln Victorian Tiled Hallway Floor Before Renovation Lincoln

I measured up and worked out a restoration plan along with the materials I would need to get the job done. Later that day I emailed over a quote to the owner, and they gave me go ahead to get the work done.

Deep Cleaning and Repairing a Victorian Tiled Hallway Floor in Lincoln

I started work by deep cleaning the floor tiles with Tile Doctor Remove and Go, this as its name suggests is a coatings remover that can deal with quite a lot of problems. A strong dilution was made and sprayed onto one section of floor at a time where it was left to soak in for roughly twenty minutes. The tiles were then scrubbed to soften the contaminates and I used a steamer and a scraper to get off as much of the glue as possible. Once done the soiling was rinsed off with water and extracted with a wet vacuum.

The initial treatment did well to remove the glue etc, but I could see more work was needed to really deep clean the years of dirt out of the Victorian tiles. For this I applied another Tile Doctor product called Nanotech HBU Remover, HBU stands for Heavy Build-Up. This was applied and extracted in the same way as before.

Victorian Tiled Hallway Floor During Renovation Lincoln

Next step was to carry out the repairs that were required which were mainly around the door thresholds. I’m not sure what it is with thresholds, but I guess this is generally where two floors meet, and the floor can experience some movement. To ensure a perfect match the owner had agreed for tiles to be removed from under the stairs so they could be re-used for the repairs. The space under the stairs was due to be boxed in as part of the renovations so you would never know.

With that done I moved onto the next step of giving the floor an acid rinse using Tile Doctor Acid Gel. This cleans up the tiles further by removing grout smears, dissolving efflorescent salts in the floor and the acidic nature of the product also neutralises the pH level of the floor after the use of strong alkaline cleaning products earlier. The floor was rinsed again afterwards, and then dried as much as possible with the wet vacuum before leaving it to dry off overnight.

Sealing a Victorian Tiled Hallway Floor in Lincoln

I left the floor to dry out for several days before returning to seal the tiles. Applying a sealer to damp tiles can result in a patchy appearance to on my return I checked the moisture levels first with a damp meter to ensure they were dry enough. The readings were fine, so I was able to apply a couple of coats of Tile Doctor Colour Grow which is a breathable colour enhancing sealer. This is a super durable product which will give great protection to the floor, especially when it is in a high traffic area such as a hallway.

Victorian Tiled Hallway Floor After Restoration Lincoln Victorian Tiled Hallway Floor After Restoration Lincoln

Once the work was completed the floor looked so much better and I’m happy to report that both the husband and wife were amazed at the transformation. Before leaving I took time to discuss aftercare and recommended the use of Tile Doctor Neutral Tile Cleaner to maintain the floor. This is a pH neutral product which will is mild enough to use every day and won’t harm the sealer. It’s supplied as a concentrate so you only need a small amount of cleaning fluid to clean the floor and so a one litre bottle will last some time.

Victorian Tiled Hallway Floor After Restoration Lincoln Victorian Tiled Hallway Floor After Restoration Lincoln


Professional Restoration of a Victorian Tiled Hallway in Lincolnshire

Restoration of a Carpet Covered Victorian Tiled Hallway Floor in Lincoln Read More »

Sandstone Staircase Cleaning Gainsborough

Sandstone Flooring and Staircase Renovated at a Gainsborough Mansion

Earlier this year I completed a job at an old mansion south of Gainsborough which had a unique Sandstone staircase and flooring. The home had been in the family for generations and my client was in the process of having it renovated. My involvement related to the Sandstone hallway and staircase which needed deep cleaning and sealing.

Sandstone Floor Tiles Before Cleaning Gainsborough

I visited the property first to survey the stone and it was clear it hadn’t been cleaned in decades so there was quite a bit to do. As an added problem there were old strips of adhesive on the steps that had been used to secure a stair carpet and the adhesive had absorbed into the stone staining it.

Sandstone Staircase Before Cleaning Gainsborough

Deep Cleaning a Sandstone Hallway and Staircase

My first task was to deep clean everything and my choice of product for this was Tile Doctor Remove and Go. This is a strong alkaline cleaner and coatings remover that’s designed for stripping off sealers and other contaminates such as adhesives; in this case however I suspect any sealer may have been work off years ago. I worked in sections and used a strong dilution decanted into a sprayer and applied to the stone; it was then left to soak in for a good ten to fifteen minutes before being scrubbed in.

For the sandstone floor tiles I used a 17-inch black scrubbing pad fitted to a weighted rotary floor buffer, the extra weight increases surface traction on the stone; I use the machine with a plastic skirt around the pad to minimise splashing. Once done the soiled solution was rinsed away with water and extracted with a wet vacuum. This process was very effective, and you can clearly see the difference in the photographs between the dirty and clean floor.

Sandstone Floor Tiles During Cleaning Gainsborough Sandstone Floor Tiles During Cleaning Gainsborough

The large buffer machine wasn’t a practical choice for scrubbing the stone staircase so to tackle that, I used back 6-inch scrubbing pads fitted to a hand buffer. It is a slower process but combined with more Tile Doctor Remove and Go it got the job done.

After rising and extracting I inspected the staircase and it was clear that the marks from the adhesive strips would need more attention to completely remove the staining. I turned to another Tile Doctor product for this called Nanotech HBU Remover, HBU stands for Heavy Build-up and it is a real problem solver for issues like this. Again, the product was left to soak in for ten minutes and then scrubbed in using a similar process as before using the handheld machine. I had to do this a few times until we were happy with the results. I then used coarse 200 and 400 grit diamond burnishing pads to even out the surface.

Sandstone Staircase During Cleaning Gainsborough

Sealing a Sandstone Tiled Hallway and Staircase Floor

After a final rinse and extraction, the floor was left to dry out completely for a few days; a lot of water is used in the cleaning process and the stone needs to be dry before applying the sealer.

On my return I took moisture readings with a damp meter to confirm the floor had dried and then started applying the sealer which for this floor I used Tile Doctor Ultra-Seal. This is an impregnating sealer that soaks into the pores of the stone adding protecting it from within, it leaves the stone with a natural finish and is almost undetectable. This product is also fully breathable which is an important point when dealing with old floors that don’t have the benefit of a damp proof membrane.

Sandstone Floor Tiles After Cleaning Gainsborough

The client was amazed by the transformation and said she had never seen the stone so much lighter and clean. For aftercare I recommended Tile Doctor Neutral Tile Cleaner which is a gentle but effective cleaning product that is safe to use on sealed stone.

Sandstone Staircase After Cleaning Gainsborough


Professional Restoration of a a Sandstone Tiled Hallway and Staircase in North Lincolnshire

Sandstone Flooring and Staircase Renovated at a Gainsborough Mansion Read More »

Victorian Hallway Floor Tile Restoration Lincoln

Victorian Tiled Hallway Restored in Lincoln

I was asked to restore this Victorian tiled hallway floor at a property in Lincoln which as you can see was in quite a state. I don’t have the full history of the floor but essentially there were two large sections of missing tiles including under and in front of the stairs. these areas had been back filled with cement to level the floor so it could be covered with lino.

Victorian Tiled Floor Before Restoration Lincoln

I’ve seen plenty of Victorian floors in my career, but I’ve never seen anything quite like it before. I discussed a price for the work which they were happy to accept and booked in a date to start.

Victorian Tiled Floor Before Restoration Lincoln

Cleaning and Repairing a Victorian Tiled Hallway Floor

The first job was to carefully remove all the cement from in front of the staircase and cut back the cement around the back of the staircase along the hall. The owner planned to create an understairs cupboard so there was no need to remove all of it as the cement floor would eventually be hidden.

With the ugly cement removed, the floor sections were brought level ready for tiling with a self-levelling compound. I had managed to source replacement tiles ready for the restoration, so then the next task was to use these to tile the floor following the existing pattern. Once they had set, I then grouted the floor.

Victorian Tiled Floor During Restoration Lincoln Victorian Tiled Floor During Restoration Lincoln

The next step was to deep clean the old and new sections of tiling for which I used Tile Doctor Remove and Go. This was left to dwell and soak in for fifteen minutes before being scrubbed in with a Black pad. The residue generated was then rinsed off and then extracted with a wet vacuum. The tiles were then inspected, and stubborn paint splashes were spot treated with more product until I was happy the floor looked clean.

The next step was to give the floor an acid rinse with Tile Doctor Grout Clean-up, this counters potential efflorescence and neutralises the pH level of the floor after using Tile Doctor Remove and Go which is alkaline. Efflorescence is a common problem with these old floors which don’t have a damp proof membrane and have been covered with rubber underlay or lino which prevents moisture rising through the floor. The floor was then rinsed and extracted again and left to dry out for a couple of days.

Sealing a Victorian Tiled Hallway Floor

On my return I checked the moisture level of the tiles with a damp meter to make sure the floor was dry before starting. All was well so I sealed the floor with four coats of Tile Doctor Colour Grow which enhanced the colours in the tile and produced a lovely matt finish. Colour Grow is a breathable sealer which will allow for any moisture to rise through the tile and evaporate at the surface, this is an important feature for old floors that don’t have the benefit of a damp proof membrane.

Victorian Tiled Floor After Restoration Lincoln

The floor looked so much better after the work was complete and my client was amazed at the transformation that had taken place. For aftercare I recommended the use of Tile Doctor Neutral Tile Cleaner which is a gentle but effective tile cleaning product that won’t harm the sealer.

Victorian Tiled Floor After Restoration Lincoln


Professional Restoration of a Victorian Tiled Hallway in North Lincolnshire

Victorian Tiled Hallway Restored in Lincoln Read More »

Cleaning and Sealing Slate Floors in Wragby

Replacing a Blown and Sticky Sealer on Slate Floors in Wragby

This client from Wragby contacted me because their Slate tiled shower room floor was covered in limescale and despite trying numerous products they couldn’t get rid of it. Also, for some reason the slate kitchen floor was always sticky, and they wanted this resolving as well. If you haven’t been, Wragby is just East of Lincoln on route to the Lincolnshire Wolds which is an area of outstanding natural beauty.

Slate Shower Floor Wragby Before Renovation

I went over to the property to survey the tiles and produce a quote for rectifying the problems. I discovered that the Kitchen floor had been over sealed with a solvent based topical seal and that had turned tacky, and in the shower room it wasn’t limescale that was the issue, in fact it was a moisture problem that had bloomed the seal. The tiles needed to be completely dry before applying a sealer or it can cause problems, also because the dining room followed from the kitchen it would need to be stripped as well of sealer and resealed otherwise the two floors would look different in colour.

Slate Kitchen Floor Wragby Before Renovation Slate Dining Room Floor Wragby Before Cleaning

I quoted for stripping and cleaning all three floors, and then re-sealing. The quote was accepted, and the job was booked in for a few weeks later.

Cleaning a Slate Tiled Kitchen, Dining and Shower Room Floor

To remove the sealer, I used a combination of Tile Doctor Remove and Go mixed with Tile Doctor Pro Clean. This was applied to the floor in the usual way, allowing it to soak in for ten minutes before being scrubbed in with a Black pad. This action removes the old sealer and further cleaned the floor.

The soiling was then rinsed away with water and extracted with a wet vacuum. A couple of the areas were more stubborn that others, so the process was repeated until I was satisfied the sealer was gone and the Slate was as clean.

Slate Dining Room Floor Wragby After Cleaning

I setup a couple of air blowers in place to assist with drying and then left the floor to dry out fully overnight.

Sealing a Slate Tiled Kitchen, Dining and Shower Room Floor

Returning the following day, I used a damp meter to take moisture readings and ensure the stone was dry before applying the new sealer, as mentioned earlier it is not a good idea to seal a wet floor.

My client wanted a shine on the floor so for the Kitchen and Dining room I used a topical water-based sealer called Tile Doctor Seal and Go Extra. For the shower floor I explained that due to the moisture it would have to be sealed with a fully breathable impregnating sealer however it would leave a matt finish, they didn’t want a repeat of before so happy to accept my recommendation the shower room floor was sealed with Tile Doctor Colour Grow.

Slate Dining Room Floor Wragby After Sealing Slate Kitchen Floor Wragby After Renovation

The whole process took 3 days, and all the floors were transformed by the work, certainly my clients were extremely happy with the result. For the aftercare cleaning of Slate floors, I recommend the use of Tile Doctor Neutral Tile Cleaner which an effective tile and grout cleaner but gentle enough not to effect the sealer.

Slate Shower Floor Wragby Before Renovation


Professional Restoration of a Slate Tiled Kitchen, Dining and Shower Room in North Lincolnshire

Replacing a Blown and Sticky Sealer on Slate Floors in Wragby Read More »

Victorian Hallway Floor Restoration Scunthorpe

Victorian Tiled Hallway Floor Repaired and Restored in Scunthorpe

This Victorian tile floor was found under a carpet in a property in Scunthorpe during redecoration. The client asked if it could be cleaned up and some minor repairs carried out so we scheduled a date for me to go over and survey the floor.

Victorian Floor Before Restoration Scunthorpe Victorian Floor Before Restoration Scunthorpe

Whilst at the property I took some measurements so I could create an accurate quote for doing the work. Sometimes I can price the work off photographs but with old floors like this I prefer to take a detailed look as you never know what you might find. Another consideration is efflorescence due to it being covered in carpet and probably rubber backed underlay, materials like this prevent the floor from breathing. Old floors like this one don’t have a damp-proof membrane it is best to let the floor dry out before doing any further work.

Cleaning and Repairing a Victorian Tiled Hallway Floor

My quotation was accepted, and the work started by addressing the the repairs using the tiles provided. The repairs however turned out to be more than expected as I discovered lots of patches that required lifting and re-fixed in place using a rapid setting adhesive and grout; this was unexpected but had to be done.

Victorian Floor During Restoration Scunthorpe Victorian Floor During Restoration Scunthorpe

The next day with the floor now stable, I started the cleaning process using Tile Doctor Remove and Go which is a strong alkaline product that cleans tiles and removes coatings. This is sprayed onto the floor and left to dwell for twenty minutes before being worked into the tiles using a buffer machine fitted with a Black scrubbing pad. This process breaks down old sealers and soils lifting them to the surface where they can be removed. The residue was then rinsed away using minimal water and extracted with a wet vacuum.

After rinsing I then repeated the process with Tile Doctor Acid Gel which further cleans up the tiles and dissolves any alkaline salts in the floor that might result in efflorescence later. As the name suggests this is an acidic product, it also neutralises the pH level of the floor after the use of alkaline cleaning products earlier.

Sealing a Victorian Tiled Hallway Floor

The hallway was then left to dry for a couple of days before returning to seal with Tile Doctor Colour Grow which has a matt finish. This is a hardwearing sealer which will ensure the high traffic area is protected and allows the natural colours of the Victorian tiles to shine through. The other reason this sealer was chosen though was that its fully breathable and will allow moisture to rise through the floor.

Victorian Floor After Restoration Scunthorpe

The client was over the moon with the result especially as I had kept to the quote and not charged for the additional tiling work. Before leaving I took time to discuss ongoing maintenance cleaning of the Victorian tiles and recommend the use of Neutral Tile Cleaner which won’t affect the sealer.


Professional Restoration of a Victorian Tiled Hallway in Lincolnshire

Victorian Tiled Hallway Floor Repaired and Restored in Scunthorpe Read More »

Victorian Hallway Floor Repair and Renovation Gainsborough

Renovation of a Beautiful Victorian Tiled Hallway Floor in Gainsborough

The photographs below were taken during the renovation of a Victorian tiled hallway floor at a property near Gainsborough. The floor was in good condition except for several areas of missing tiles which had been back filled with cement.

Victorian Hallway Floor Before Renovation Gainsborough Victorian Hallway Floor Before Renovation Gainsborough

There were also two doorway sections where the owner wanted additional tiles adding to match the original. Fortunately, there was a large entrance matting covering more tiles, so I was able to take what I wanted from there to carry out the repairs.

Victorian Hallway Floor Before Renovation Gainsborough

Repairing a Victorian Tiled Hallway Floor

Work commenced with the tiling work carefully removing the tiling from under the entrance matting and then cleaning them up. The matting was then dropped into the floor so it was level with the tiles.

The sections that had been replaced with concrete were then carefully scraped out and then prepped to take the tiles level with the existing floor. I dry fitted the tiles first cutting some of them as required to match the existing pattern.

Victorian Hallway Floor During Renovation Gainsborough Victorian Hallway Floor During Renovation Gainsborough

Once I was happy with the pattern, they were then secured in place with a rapid setting adhesive and then grouted. There were a couple of areas that needed this attention and the two door thresholds so this work took up the whole of day one.

Repairing a Victorian Tiled Hallway Floor

The next day the adhesive and grout had set and I was able to turn my attention to getting the floor clean and removing any remaining sealer. To do this I applied a strong dilution of Tile Doctor Remove and Go and left it to soak in for twenty minutes. The dwell time gives the product time to work into the tile and break down the old sealants and dirt. The floor was then scrubbed using a black pad fitted to a rotary machine and you could see the dirt lifting out of the tiles.

I worked in sections and used a wet vacuum to extract the dirt that had been released from the tiles. Once done I inspected the floor and spot treated any areas that needed more work.

With that done I moved onto the next step of giving the floor an acid rinse using Tile Doctor Acid Gel. This cleans up the tiles further by removing grout smears, dissolving efflorescent salts in the floor and the acidic nature of the product also neutralises the pH level of the floor after the use of strong alkaline cleaning products earlier. The floor was rinsed again afterwards, and then dried as much as possible with the wet vacuum before leaving it to dry off overnight.

Sealing a Victorian Tiled Hallway Floor

The next day the moisture levels of the tiles were checked with a damp meter to ensure they were dry enough to be sealed. The readings were fine, so I was able to apply a couple of coats of Tile Doctor Colour Grow which is a breathable colour enhancing sealer. This is a super durable product which will give great protection to the floor, especially when it is in a high traffic area such as a hallway.

Victorian Hallway Floor After Repair and Renovation Gainsborough

My client was very happy with the result and hadn’t really expected it to come out as well as it did. Before leaving I took time to discuss aftercare and recommended the use of Tile Doctor Neutral Tile Cleaner to maintain the floor. This is a pH neutral product which will is mild enough to use every day and won’t harm the sealer. It’s supplied as a concentrate so you only need a small amount of cleaning fluid to clean the floor and so a one litre bottle will last some time.

Victorian Hallway Floor After Repair and Renovation Gainsborough Victorian Hallway Floor After Repair and Renovation Gainsborough


Professional Renovation of a Victorian Tiled Hallway in Lincolnshire

Renovation of a Beautiful Victorian Tiled Hallway Floor in Gainsborough Read More »

Brick Slip Tiled Bathroom Floor Renovation Saxilby

Grout Haze Removed from Brick Slip Bathroom Flooring in Saxilby

I was asked if I could improve the look of this new bathroom floor that had been laid with brick slips in a herringbone pattern at a property in Saxilby near Lincoln. The builder had done a solid job of laying the bricks but had been overzealous on the grouting and was unable to remove all of it resulting in a whitening of the red bricks due to grout haze. Unhappy with the appearance of their new bathroom floor and with little chance of resolution with the builder they contacted Tile Doctor to see what could be done to improve their appearance.

Brick Slip Tiled Bathroom Floor Before Cleaning Saxilby

Brick Slip tiles are basically a very thin brick which allows it to be laid like a tile, normally they are cut from an actual clay brick although there are other types. Thin like a tile and light weight they can be used to quickly create authentic looking brick walls and floors.

I visited the property to understand the problems and whilst I was there, I carried out a test clean to show the client what could be achieved. They were happy with what I showed them and booked me in to have the work done.

Brick Slip Tiled Bathroom Floor Before Cleaning Saxilby Brick Slip Tiled Bathroom Floor Before Cleaning Saxilby

Removing Grout Haze from Brick Slip Flooring

To remove the grout haze, I started off with an application of Grout Clean-up which contains phosphoric acid and is designed exactly for this purpose. It was a small space to work in so the product was scrubbed into the tile by hand until I got them as clean as possible. This was followed by a quick rinse and extraction with a wet vacuum.

I then inspected the floor and could see more work was required so this time I laid down Acid Gel which is a blend of Phosphoric and Hydrochloric acids and left it to dwell for ten minutes. After another scrub I was pleased to see I had managed to remove all the grout haze and the red brick was really starting to come through. I then gave the floor a thorough rinse with water and then removed the soiling and as much moisture as possible with the wet vacuum. I left the floor to dry off whilst I went to lunch leaving an air mover in place to assist with the drying.

Sealing Brick Slip Flooring

Once it had dried the floor was then sealed using Tile Doctor Colour Grow which is a colour enhancing product that as the name suggests improves colour in the tile, it’s also an impregnator which works by occupying the pores in the brick protecting it from within.

Brick Slip Tiled Bathroom Floor After Cleaning Saxilby Brick Slip Tiled Bathroom Floor After Cleaning Saxilby

The client was over the moon and said that is how they wanted it to look originally. For cleaning I made the client aware of the problem of using harsh cleaning products on sealed tiles and advised them to use Neutral Tile Cleaner which is a mild but effective cleaner that won’t erode the sealer with regular use.

Brick Slip Tiled Bathroom Floor After Cleaning Saxilby


Professional Restoration of Brick Slip Flooring in Lincolnshire

Grout Haze Removed from Brick Slip Bathroom Flooring in Saxilby Read More »

Limestone Floor Renovation Doddington Hall Lincoln

Limestone Floor Renovated at Historic Doddington Hall, Lincoln

I was asked to carry out a deep clean and seal on this Limestone floor at a property which is part of the Doddington Hall Estate outside of Lincoln. Doddington Hall dates to the Elizabethan era and I was informed that the limestone tiles were originally from Lincoln Cathedral, so they had a lot of history. The hall is used commercially to host weddings and other events to the floors at the property do get a lot of use.

Limestone Floor Before Cleaning Doddington Hall Lincoln

Unfortunately, years of use had taken its toll on the Limestone tiles, and they had not been professionally cleaned for some time. With this much history the owner didn’t want to take any risks with the renovation and so Tile Doctor was asked to do the work. We have a good reputation however it felt it was a great testimonial to be asked to renovate such a historical floor. Naturally this does come with a certain amount of pressure to make sure this job was high class.

Limestone Floor Before Cleaning Doddington Hall Lincoln

Before quoting, I paid a visit to the property to survey the floor and run some cleaning tests to work out the best approach. A price was given for the work, and I was given the go ahead to get started.

Limestone Floor Before Cleaning Doddington Hall Lincoln

Cleaning a Limestone Tiled Floor

From the testing I conducted earlier I had worked out that the previous sealer had failed and dirt had accumulated in the stone, so work started with the application of a strong dilution of Tile Doctor Pro-Clean which is our go to Tile and Grout cleaner. The solution was sprayed onto the tile and grout and then left to soak in for at least ten minutes so it can get to work breaking down the dirt and what was left of the old sealer. At this point I also took time to work the Tile Doctor Pro-Clean into the grout using a stiff brush to get it as clean as possible.

The cleaning solution was then worked into the stone using a coarse 100-grit pad fitted to a weighted rotary machine to achieve maximum contact. I started with this pad in order to cut the surface back and remove scratches. The floor was then rinsed with water and the soil extracted with an industrial wet vacuum.

I then followed up with a 200-grit pad lubricated with water making sure to go over each tile three to four times to leave a honed finish. After another round of rinsing and extracting the floor was looking so much cleaner. The whole floor was then checked, and any issues spot treated.

Limestone Floor During Cleaning Doddington Hall Lincoln

It was a large floor, so it took the whole of the first day to get it clean, then once done I left it to dry out fully overnight.

Sealing a Limestone Tiled Floor

When I returned the floor was lovely and dry, so I was able to seal the Limestone tiles with a breathable impregnating sealer. I chose Tile Doctor Ultra Seal for the job as this doesn’t darken the stone and leaves it looking natural all features that matched their requirements, also the product works by soaking into the pores of the stone protecting it from within so will last for many years to come.

Limestone Floor After Cleaning Sealing Doddington Hall Lincoln

I chose a breathable sealer as properties of this age don’t have a damp proof membrane installed and so its important to use a sealer that will let any moisture in the subfloor rise through the stone and evaporate at the surface.

Limestone Floor After Cleaning Sealing Doddington Hall Lincoln

Once finished the Limestone floor looked transformed by the work and I’m happy to say it met the expectations of the owner who was extremely happy with the results. For aftercare cleaning I recommended the use of Tile Doctor Neutral Tile Cleaner; this would ensue the newly applied sealer stayed put, most floor cleaning products you find in supermarkets are simply too strong for use on sealed stone and will erode the sealer.

Limestone Floor After Cleaning Sealing Doddington Hall Lincoln


Professional Restoration of a Limestone Tiled Floor in Lincolnshire

Limestone Floor Renovated at Historic Doddington Hall, Lincoln Read More »

Multicoloured Slate Floor After Cleaning Caistor Lincolnshire

Beauty Restored to a Dull Multi Coloured Slate Floor in Caistor

I was contacted by a couple from the Lincolnshire market town of Caistor who had a beautiful multi-coloured Slate floor installed in their Kitchen, Hallway and WC. They had moved into the property a few years ago and during that time they had noticed how the appearance of the slate and grout had slowly degraded, they had tried to deep clean it themselves but gave up and decided to get some help.

Multicoloured Slate Floor Before Cleaning Caistor Multicoloured Slate Floor Before Cleaning Caistor

I arranged a time to go over to the property, survey the tiles and provide a quote for doing the work. I could see the sealer was wearing off and nothing was in place to stop dirt from becoming trapped in the pores of the slate. I provided a quote for stripping the old sealer off the whole floor, deep cleaning the stone to remove the dirt and then once clean and dry applying a fresh sealer. The quote was accepted, and a date arranged to do the work.

Multicoloured Slate Floor Before Cleaning Caistor Multicoloured Slate Floor Before Cleaning Caistor

Cleaning a Multi-Coloured Slate Tiled Floor

The job was very straight forward, and the type of job Tile Doctor carries out on a regular basis. On the first day I started by applying a strong dilution of Tile Doctor Remove and Go and let it soak into the tiles for ten minutes. Then using a black scrubbing pad fitted to a rotary floor buffer the solution was worked into the stone to strip off what remained of the remaining sealer and pull the dirt out of the stone. At this point I also ran a stiff brush along the grout lines to get them as clean as possible.

The floor was then rinsed, and the soiled solution was removed using a wet vacuum.
At this point the floor was inspected and the process repeated on a couple of stubborn areas. The area was quite large, so we worked around methodically and once done the floor was thoroughly rinsed and dried again with the wet vacuum.

Sealing a Multi Coloured Slate Tiled Floor

After rinsing I left the floor to dry out over a few days and returned a couple of days later to seal with 2 coats of Tile Doctor Colour Grow. I selected this sealer as it a colour intensifier so will bring out the best in the colours of the multi coloured slate. It has a matt finish so it is not too shiny, but is very hardwearing, giving great protection to these high traffic areas.

Multicoloured Slate Floor After Cleaning Caistor Multicoloured Slate Floor After Cleaning Caistor

The household is a busy one, so keeping the floor in good condition will ensure maintenance is easier. With this in mind, I also recommended the use of Tile Doctor Neutral Tile Cleaner, this is pH neutral and is mild enough to use daily. A small amount of the product goes a long way, so the bottle will last, and it has a lovely fresh smell.

My client was over the moon with the results and wished she had had it done sooner.

Multicoloured Slate Floor After Cleaning Caistor Multicoloured Slate Floor After Cleaning Caistor

Professional Restoration of a Multi Coloured Slate Tiled Kitchen, Hallway and WC Floor in North Lincolnshire

Beauty Restored to a Dull Multi Coloured Slate Floor in Caistor Read More »

Encaustic Floor Cleaning Hemswell Cliff

Cleaning and Sealing Encaustic Kitchen Floor Tiles in Hemswell Cliff

The photographs below are of an Encaustic Tiled Floor which had been installed some years prior in the kitchen of at a property in the village of Hemswell Cliff which is between Gainsborough and Market Rasen.

I paid a visit to the property initially to survey the floor and discuss the problem with the client. The main issue was the tiles had become dull and she couldn’t keep them clean. I explained that Encaustic tiles are porous and need to be kept sealed to prevent the dirt from becoming ingrained in its pores; over the years since installation the sealer had simply worn down and now dirt was getting into the pores of the tile and once that happens it can be difficult to get it out.

To prove my point, I carried out a demonstration on how I would clean them and explained the different sealer options available and how each sealer can have a different effect. She was pleased with the demonstration and was happy to accept my quote to deep clean the whole floor and then re-seal it.

Encaustic Floor Before and After Cleaning

Deep Cleaning Encaustic Kitchen Floor Tiles

I set about scrubbing the floor using a hot water dilution of Tile Doctor Pro-Clean Tile and Grout cleaner combined 50:50 with NanoTech HBU Remover which adds tiny abrasive particles to the solution to make a more effective cleaning product. The solution was worked into the tiles by scrubbing with a rotary machine fitted with a Black scrubbing pad.

The pads struggle to reach into the recesses between the tiles so to get the grout clean I scrubbed them by hand using a stiff brush. Once done the soiled solution was removed using a wet vacuum and floor inspected to ensure it was as clean as possible. Any stubborn areas were spot treated by hand and then the whole area thoroughly rinsed down with clean water to remove any trace of cleaning product.

Finally, the wet vacuum was used to dry the floor as much as possible with assistance from a Turbo Air blower to help reduce the drying time.

Sealing Encaustic Floor Tiles

It wasn’t a particularly large floor and a warm day so I was able to complete the cleaning process by lunch time and after a few hours later with the assistance of the air blower the floor was dry and ready to be sealed.

Having discussed sealer choice with the client earlier a decision had been made to seal the encaustic tiles with Tile Doctor Seal and Go which adds a nice subtle sheen to the tile. Five coats of Tile Doctor Seal and Go were needed before the tiles were fully sealed, it’s a water based protective sealer so it doesn’t give off any odour whilst it dries and it provided the finish the customer was looking for.

Once completed the colours in the tiles were really vivid and resulted in one happy customer with a clean easy to maintain floor. On the subject of cleaning, I recommended the use of Tile Doctor Neutral Tile Cleaner which is a mild but effective tile cleaner. The problem with many of the tile cleaning products you find in supermarkets is they contain bleach which is simply too strong for use on a sealed tile as it will strip off the sealer.


Professional Maintenance Cleaning of Encaustic Floor Tiles in Lincolnshire

Cleaning and Sealing Encaustic Kitchen Floor Tiles in Hemswell Cliff Read More »

Slate Kitchen Floor Renovation Scunthorpe

Slate Tiled Kitchen Floor Stripped, Cleaned and Sealed in Scunthorpe

I was approached by the owner of a property in Scunthorpe, who wanted me to restore the appearance of the Slate tiles in their Kitchen and Hallway. They had previously another company to clean the floor but it was clear that they had little experience of cleaning sealed floors and had struggled to remove what was left of the original seal leaving the floor in a worse state.

Sealer wears in the busiest sections of a floor first, so to achieve a nice even finish its vital to strip off all the original sealer before cleaning and then re-sealing. To prove our ability to restore the floor, I conducted a demonstration on a small test area, which satisfied the owner that we were capable of the job. We scheduled a date for my return to do the work which would take two days, one to strip off the old sealer and deep clean the floor and the second to apply a fresh seal.

Slate Kitchen Floor Before Cleaning Scunthorpe

Cleaning slate Floor Tiles in Scunthorpe

To strip off the sealer and deep clean the tile and grout I used a strong dilution of Tile Doctor Remove and Go which is an alkaline product safe to use on natural stone such as Slate. We primarily use this product for removing coatings such as sealers, adhesives, and paint splashes however it’s also a good tile cleaner as well.

The product is applied by diluting it into an industrial sprayer and then spraying the solution onto the floor. It’s then left to soak in for ten minutes so it can get to work breaking down the coatings etc. The solution is then scrubbed into the tile and grout using a Black pad fitted to a rotary machine which is run over each tile several times.

The pads can struggle to reach into the recesses of the grout lines so to get the grout clean Tile Doctor Pro-Clean is applied to the grout line and scrubbed in by hand with a stiff brush.

Finally, I gave the floor a through rinse with water and then extracted the soiling with a wet vacuum. The Slate tile and grout was then inspected and the process repeated where required until I was satisfied all the old sealer was gone and the floor was as clean as it could be.

Sealing Slate Floor Tiles in Scunthorpe

The next day I checked the floor was dry using a moister meter which thankfully it was and so I was able to apply the sealer which for this floor I had chosen Tile Doctor Colour Grow.

This product was chosen due its matt finish and its colour enhancing formula which brought out the deep rich tones in the dark Slate. This product is an impregnator which works by seeping into the stone, occupying the small pores and thereby preventing dirt from becoming ingrained there. Its hard wearing, ideal for use in a Kitchen and will provide maximum stain protection for many years to come.

Slate Kitchen Floor After Cleaning Sealing Scunthorpe

My customer was happy to finally have the floor looking they way it was when it was installed and relieved to have found a local company that could maintain the floor for her in the future.

For aftercare I advised the use of Tile Doctor Neutral Cleaner, part of the problem with stone floors is the use of strong cleaning products which are not designed for use on sealed floors and will cause the sealer to erode prematurely.


Professional Slate Floor Renovation in Scunthorpe Lincolnshire

Slate Tiled Kitchen Floor Stripped, Cleaned and Sealed in Scunthorpe Read More »

Quarry Tiled Kitchen Floor Cleaning Grimsby

Quarry Tiled Kitchen Floor Deep Cleaned and Sealed in Grimsby

Details below of a Quarry Tiled kitchen floor we were asked to deep clean in the town of Grimsby which is well known as a fishing port. The Quarry tiles were looking dull and tired, there was some staining to the grout all of which is quite typical of the wear and tear you would expect in a kitchen.

Quarry Tiled Kitchen Floor Before Cleaning Grimsby

Quarry tiles are made from clay, which is porous, so unless protected by a sealer they will start to absorb dirt into the pores and once that happens, they will discolour and become difficult to clean easily. Grout is a similar story, being cementitious the top layer is rough and attracts dirt which over time causes it to go dark.

Quarry Tiled Kitchen Floor Before Cleaning Grimsby

Cleaning Kitchen Quarry Tile and Grout

Sealers wear down in the busiest parts of the floor first and adding a new sealer on top of an old sealer can result in a very patchy appearance. As a result, it’s always best to strip off the original sealer first.

My method for renovating the floor started with the application of a strong solution of Tile Doctor Pro-Clean which was sprayed onto the Quarry tile and Grout and left to soak in for about ten minutes. The solution was then scrubbed into the tile with a rotary machine fitted with a black scrubbing pad.

The grout also need attention, unfortunately we don’t have a machine that will get into the grout lines so this had to be manually scrubbed by hand using a grout brush, which as you can imagine took some time to do. The soiled cleaning solution was then rinsed off the floor and removed using a wet vacuum.

The Quarry tile and grout was then inspected and further spot cleaning performed where needed until I was satisfied the floor was as clean as it could be. Once done,
the floor was rinsed thoroughly, dried as much as possible using the wet vacuum and then left to dry off overnight.

Sealing Kitchen Quarry Tile and Grout

The next day work started by checking the moisture readings in the tile using a damp meter. It’s not a good idea to apply a sealer to a damp floor so it’s always a good idea to check first.

The readings were good so I started with the application of the first coat of what would be six coats of sealer. I find Tile Doctor Seal and Go is the best choice for sealing Quarry tiles which provides stain protection to the quarry tile and grout and leaves a nice deep low sheen on the tile surface. Additionally, being water based it doesn’t give off an odour as it dries.

Quarry Tiled Kitchen Floor After Cleaning Grimsby

The result was a complete transformation, the colour of the Quarry tiles was improved enormously and the grout lost its dark appearance. The floor looked like a new installation and my client was very happy with the result as you can imagine.

Quarry Tiled Kitchen Floor After Cleaning Grimsby

For aftercare cleaning I recommend the use of Tile Doctor Neutral Cleaner, it’s a gentle but effective tile and grout cleaner that won’t impact the sealer which is the problem with most of the products you find in supermarkets which are simply too strong for use on a sealed floor.


Professional Quarry Tiled and Grout Renovation in Grimsby

Quarry Tiled Kitchen Floor Deep Cleaned and Sealed in Grimsby Read More »

Scroll to Top